728x90
- Android 인플레이션이란?
XML 레이아웃 파일의 내용을 메모리상에 로드하여 화면에 보여주는 과정을 인플레이션이라고 합니다.
인플레이션은 크게 2가지로 나뉘는데 전체 인플레이션과 부분 인플레이션입니다.
- 전체 인플레이션
전체 인플레이션은 자바파일의 기본메소드인 onCreate 에 기본 정의된 setContentView 를 통해 구현됩니다.
setContentView(R.layout.[XML 레이아웃 파일명]);
- 부분 인플레이션
부분 인플레이션을 이용하려면 LayoutInflater 라는 클래스를 이용하여 사용할 수 있습니다.
LayoutInflater inflater = (LayoutInflater) getSystemService(Context.LAYOUT_INFLATER_SERVICE);
inflater.inflate(R.layout.[XML 레이아웃 파일명], [레이아웃 객체명], true);
MainActivity.class 소스코드
import android.content.Context;
import android.support.v7.app.AppCompatActivity;
import android.os.Bundle;
import android.view.LayoutInflater;
import android.view.View;
import android.widget.Button;
import android.widget.LinearLayout;
import android.widget.Toast;


public class MainActivity extends AppCompatActivity {

    LinearLayout container;

    @Override
    protected void onCreate(Bundle savedInstanceState) {
        super.onCreate(savedInstanceState);
        setContentView(R.layout.activity_main);

        container = findViewById(R.id.container);

        Button btn = findViewById(R.id.btn);
        btn.setOnClickListener(new View.OnClickListener() {
            @Override
            public void onClick(View v) {
                LayoutInflater inflater = (LayoutInflater) getSystemService(Context.LAYOUT_INFLATER_SERVICE);
                inflater.inflate(R.layout.sub1, container, true);
                Button btn2 = container.findViewById(R.id.btn2);
                btn2.setOnClickListener(new View.OnClickListener() {
                    @Override
                    public void onClick(View v) {
                        Toast.makeText(getApplicationContext(), "부분 인플레이션 버튼을 클릭하셨습니다.", Toast.LENGTH_SHORT).show();
                    }
                });
            }
        });
    }
}
activity_main.xml 소스코드
<?xml version="1.0" encoding="utf-8"?>
<LinearLayout
    xmlns:android="http://schemas.android.com/apk/res/android" android:layout_width="match_parent"
    android:layout_height="match_parent"
    android:orientation="vertical"
    >

    <TextView
        android:layout_width="match_parent"
        android:layout_height="wrap_content"
        android:text="전체 인플레이션 사용 페이지의 텍뷰입니다."
        />

    <Button
        android:layout_width="match_parent"
        android:layout_height="wrap_content"
        android:text="부분 인플레이션 활성화"
        android:id="@+id/btn"
        />

    <LinearLayout
        android:layout_width="match_parent"
        android:layout_height="wrap_content"
        android:orientation="vertical"
        android:id="@+id/container"
        >


    </LinearLayout>

</LinearLayout>
sub1.xml 소스코드
<?xml version="1.0" encoding="utf-8"?>
<LinearLayout
    xmlns:android="http://schemas.android.com/apk/res/android" android:layout_width="match_parent"
    android:layout_height="match_parent"
    android:orientation="vertical"
    >

    <TextView
        android:layout_width="match_parent"
        android:layout_height="wrap_content"
        android:text="부분 인플레이션 사용 페이지의 텍뷰입니다."
        />

    <Button
        android:id="@+id/btn2"
        android:layout_width="match_parent"
        android:layout_height="wrap_content"
        android:text="버튼입니다" />


</LinearLayout>
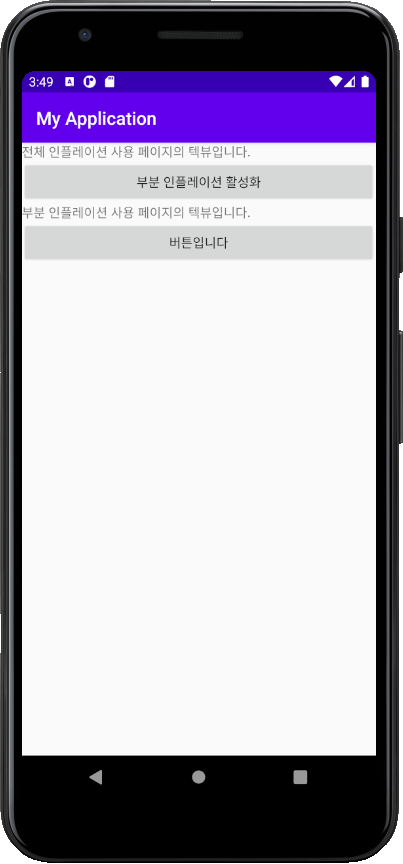
실행화면


728x90
반응형
'안드로이드 기반 앱 개발부 > 자바 코드 개발청' 카테고리의 다른 글
| 안드로이드 java 소스를 통한 layout 구성해보기 (0) | 2021.04.01 |
|---|---|
| 안드로이드 번들(Bundle) (0) | 2021.03.31 |